"How to change the name in this design?" quite a few people ask the same question on our Facebook pages, this is really not a difficult task for those who are more experienced, but for those who just getting started, this is not something that can be clearly answered in the Facebook post. So I made this step-by-step How-to, so you will know exactly how to achieve it, and hopefully, once you know those commands, you would be able to utilize them to branch out to create something else in the future.
Basic Information is loading...
Step 1
First, open xTool Creative Software, and click the "Project" tab on the upper right corner
that will open up the project pages, you can search and find the project you like to try, the one we are using today, is the
"Internation Woman's Day Gift", the personalizable long stem rose.
Click on the image to open the project
go ahead and read through the instructions, and it is always a good idea to use the material recommended at first
Click "Start project", the project will open on the XCS canvas
This project has two parts, the "Felt" layer, and the "Wood" layer, you need the modification on both layers
Step 2
Now, let's begin with the modification, the demonstration here is shown on the "Wood" layer.
So our goal is to replace the name part with the name of your choice, if this is a drawing, what you need to do is to erase the name "Juan" first, then draw or write the new name in that empty space, so that is exactly what we are going to do on the XCS.
Draw a rectangle over the name "Juan", then move and resize the rectangle to cover the whole name
Select both the rose and the rectangle, pull down the "Combine" menu, and select "subtract", this will cut out the portion inside the rectangle
This will create an open space for the new name
Step 3
Now, let's add the new name to the space we created
Click on the "Text" menu on the sidebar, then a "text box" and the "Text Menu" will appear
Go ahead and type in the new name, and pick a Typeface of your choice, a script font will work better for welding, then while the text is still selected, click the "Text Weld"operation, to weld all the letters together
** If you haven't done so, please update your software to V1.2.14, because you will like the "Text Weld" function **
Step 4
The last step is to put your new name in place and connect it to the rose
First, use the "Rotation" menu, and enter "90" to turn the text 90 degrees
Move and resize the name to fit the empty space, and make sure both ends of the text will overlap with the rose stem
Select both the rose and the name, go to the "Combine" menu, and select "Unite"
You got your new name in place
Step 5
So, now, instead of doing the whole process for the "Felt" layer, you can use the "Outline" tool to create the felt layer.
Select the image, click on the "Outline" menu, then at the pop-up, supposedly by changing the distance to "0", should create an outline of the original image, but this time, it will create an exact outline of all geometries, so workaround method, is by entering a very small amount, such as "0.001", this will do the trick, and don't forget to click "ok" to create the outline.
The result is an just outline of the design.
Now, you are ready to load your material and do the cutting.
Step 6
As I mentioned earlier, you can use the same method to create something different, for instance, you can cut off the rose, and add any other SVG of your choice. Here are some examples.

First, open xTool Creative Software, and click the "Project" tab on the upper right corner
that will open up the project pages, you can search and find the project you like to try, the one we are using today, is the
"Internation Woman's Day Gift", the personalizable long stem rose.
Click on the image to open the project
go ahead and read through the instructions, and it is always a good idea to use the material recommended at first
Click "Start project", the project will open on the XCS canvas
This project has two parts, the "Felt" layer, and the "Wood" layer, you need the modification on both layers
Now, let's begin with the modification, the demonstration here is shown on the "Wood" layer.
So our goal is to replace the name part with the name of your choice, if this is a drawing, what you need to do is to erase the name "Juan" first, then draw or write the new name in that empty space, so that is exactly what we are going to do on the XCS.
This will create an open space for the new name
Now, let's add the new name to the space we created
Click on the "Text" menu on the sidebar, then a "text box" and the "Text Menu" will appear
Go ahead and type in the new name, and pick a Typeface of your choice, a script font will work better for welding, then while the text is still selected, click the "Text Weld" operation, to weld all the letters together
** If you haven't done so, please update your software to V1.2.14, because you will like the "Text Weld" function **
The last step is to put your new name in place and connect it to the rose
First, use the "Rotation" menu, and enter "90" to turn the text 90 degrees
Move and resize the name to fit the empty space, and make sure both ends of the text will overlap with the rose stem
Select both the rose and the name, go to the "Combine" menu, and select "Unite"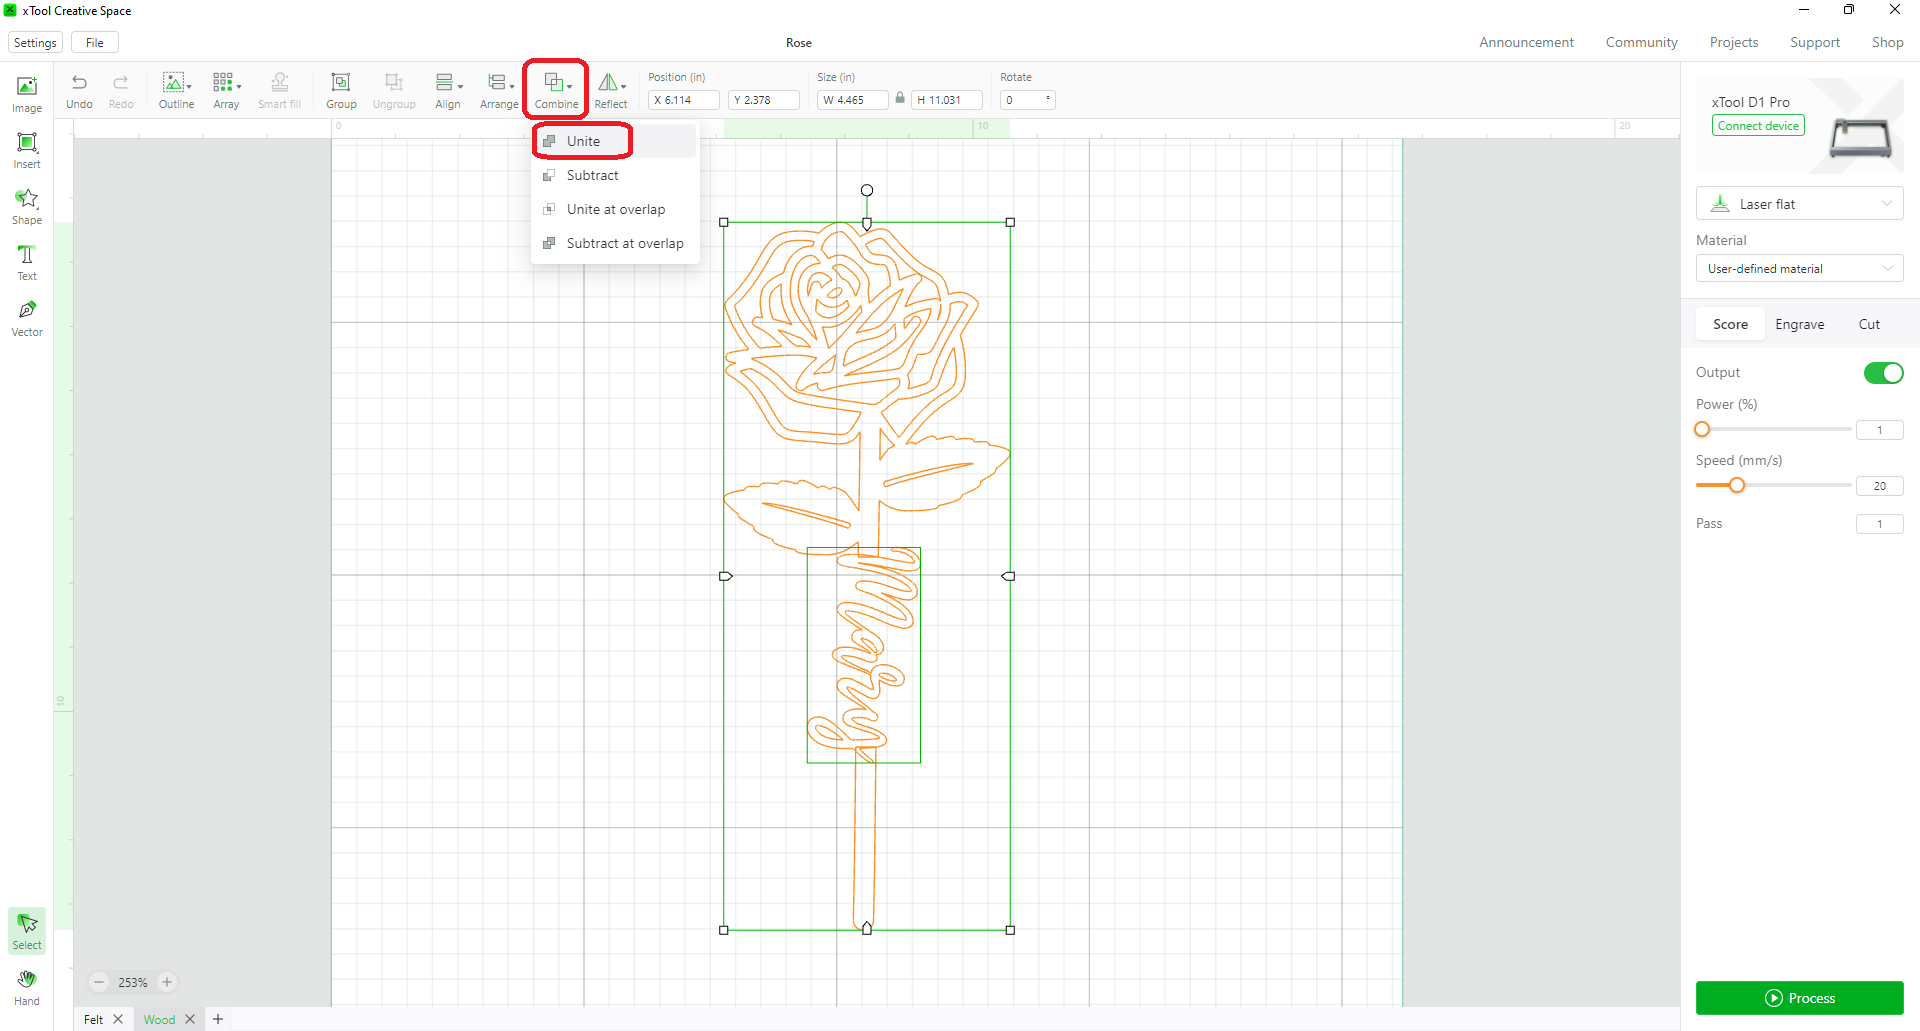
You got your new name in place
So, now, instead of doing the whole process for the "Felt" layer, you can use the "Outline" tool to create the felt layer.
Select the image, click on the "Outline" menu, then at the pop-up, supposedly by changing the distance to "0", should create an outline of the original image, but this time, it will create an exact outline of all geometries, so workaround method, is by entering a very small amount, such as "0.001", this will do the trick, and don't forget to click "ok" to create the outline.
The result is an just outline of the design.
Now, you are ready to load your material and do the cutting.
As I mentioned earlier, you can use the same method to create something different, for instance, you can cut off the rose, and add any other SVG of your choice. Here are some examples.